Reading a conversion
A preview shows you what a conversion looks like. It does not show you whether it will sew.
The two things that decide that are both invisible on screen. This page makes them visible, using real output from the sample bottle cap at a 90 mm finished size.
These styles are experimental. Image to Embroidery is on the same footing as the type system — actively being rebuilt, and meant to be played with rather than relied on. The checks on this page are how you tell, for yourself, whether a given result is worth sewing. See where this is going for the node-based direction we would like to take it.
The short version. Before you press Accept, ask four questions: does it fill the frame, how much of it is the machine travelling instead of sewing, are the stitches long enough to exist, and how many times will you change thread. The rest of this page is how to answer each one.
1. Jump travel — the machine moving without sewing
A jump is the needle lifting and the carriage moving somewhere else. No thread is laid, but thread still spans the gap, so on a single-needle machine every long jump is a float you cut by hand afterwards.
In these plates, dark lines are sewn thread and red lines are jumps.
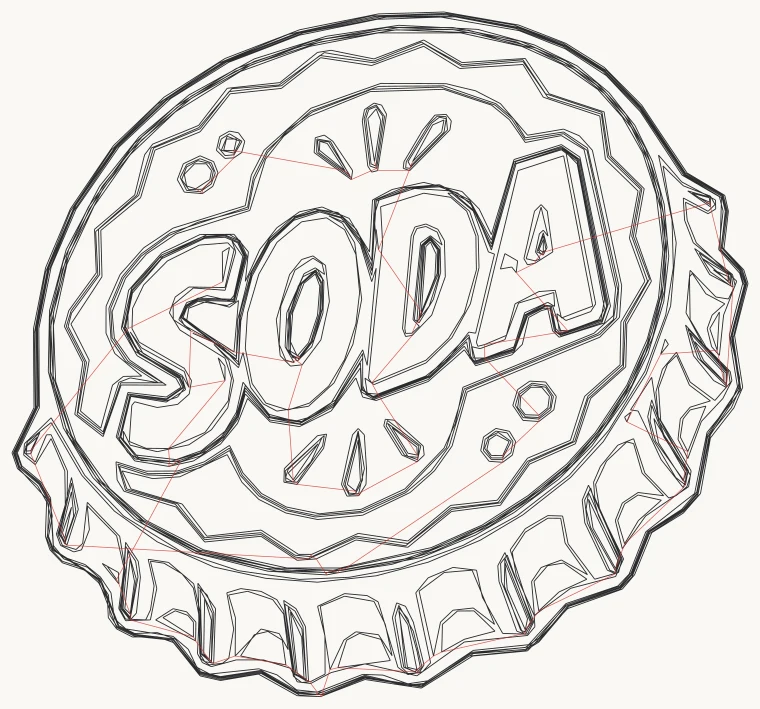
Contour — 4,654 stitches, 8.9 m of thread, 0.46 m of jump travel. The red is barely visible because the jumps are short hops between neighbouring lines. This is what healthy travel looks like.
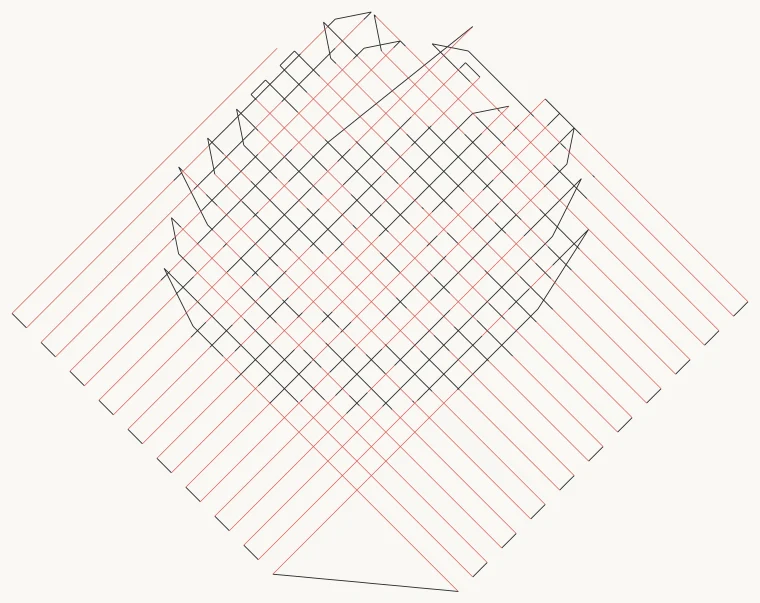
Sashiko — 1,213 stitches, 1.4 m of thread, 2.46 m of jump travel. Nearly twice as much travel as stitching, across 155 jumps. You can also see the grid running well outside the cap: at a 90 mm target this returns a 144 × 113 mm design, which does not fit a 100 mm hoop.
What to do about it. Jump travel is not automatically bad — a design with separate parts has to get between them. What matters is the ratio. If a style is laying more travel than thread, you will spend longer trimming than the design is worth. Prefer a style whose red stays short and local, or use Connectors to control travel between shapes yourself.
2. Stitch length — stitches too small to exist
A needle needs a certain distance between penetrations to actually make a stitch. Below roughly 0.5 mm it stops stitching and starts punching the same hole repeatedly: thread piles up, tension fights it, and on a tight weave it perforates the fabric.
In these plates, a red dot marks every stitch shorter than 0.5 mm.
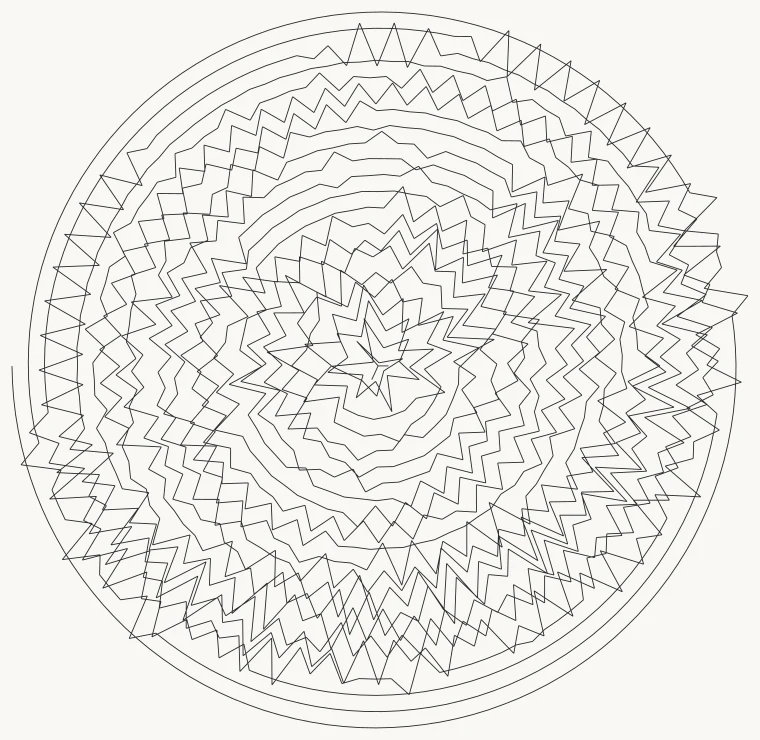
Spiral — 2,608 stitches, none under 0.5 mm. A clean plate. One continuous line, no jumps, every stitch long enough to be a stitch.
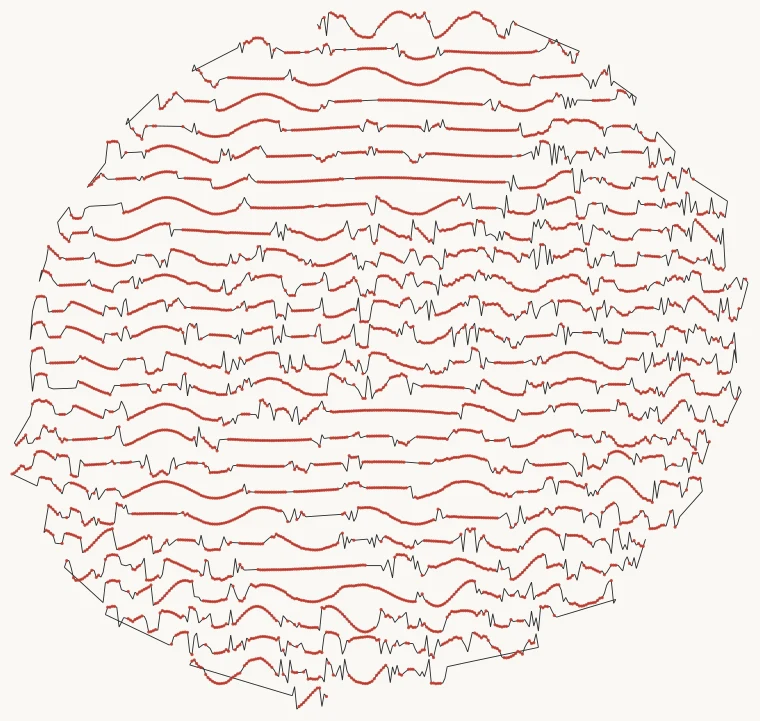
Wave — 6,205 stitches, 4,808 of them (77.5%) under 0.5 mm. The dots are so dense they read as solid red lines. On screen this preview looks completely reasonable.
What happens at export. bisect drops sub-minimum stitches that are redundant — where removing one does not change the path the thread takes. Direction-bearing short stitches are kept, because they carry real coverage. So the file that reaches your machine is usually smaller than the preview:
| Style | Preview shows | Export sews |
|---|---|---|
| Contour | 4,654 | 4,654 |
| Spiral | 2,608 | 2,608 |
| Wave | 6,205 | ~4,100 |
| Thread Painting | 30,755 | ~17,700 |
A large gap between those two columns is a signal in itself: it means most of what you previewed was not stitching.
3. Size — does it fill the frame?
Some styles work top-to-bottom within a stitch budget. On busy artwork the budget can run out partway down, and the result is a design with the bottom missing — which is easy to miss, because the preview shows exactly what was generated.
Check the preview covers the whole picture. If the bottom third is empty and your artwork is not, that is truncation, not style. It shows up most on Scribble and Wave with detailed source images.
Size is also the thing that decides everything else. The same artwork at 40 mm and at 120 mm are different jobs: at small sizes, detail stops being sewable and the styles that measure in millimetres will tell you how many marks they dropped. Set your finished size first, then judge the preview.
4. Thread changes
Every distinct colour is a manual thread change on a single-needle machine — you stand at the machine for each one. Four colours is three changes.
Most of the artistic styles sew in one colour, so this only really applies to the colour styles: Logo / Artwork, Pixel Tiles, and the Colour Plates pair. Pixel Tiles is the well-behaved one here — it produces exactly one colour block per thread, so the number of changes equals the size of the palette, and it maps each one to a real Brother thread number.
For the trace styles, the count can land above your palette size: sew order follows paint order, so a colour that appears both above and below another cannot be bunched into a single block. Asking for five colours does not guarantee four changes.
A worked example of what doesn't work
Everything above uses the bottle cap, which traces well. Here is one that does not, and it fails in a way worth recognising because the preview looks plausible.
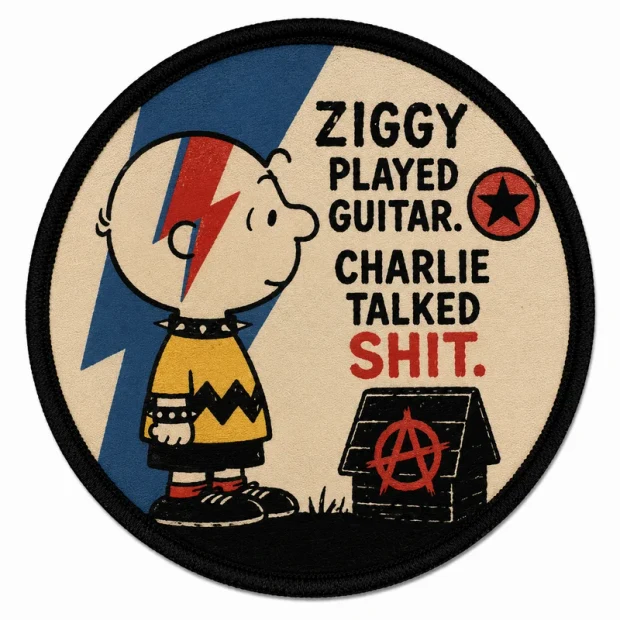
This patch has a lot going on, but the thing that breaks it is narrower than "busy": its black does two jobs at once. Black is the outline around every element and it is a large filled area — the border ring, the doghouse, the character's shorts and shoes.
Here it is through Logo / Artwork at 75 mm, asking for 4, 6 and 8 colours:
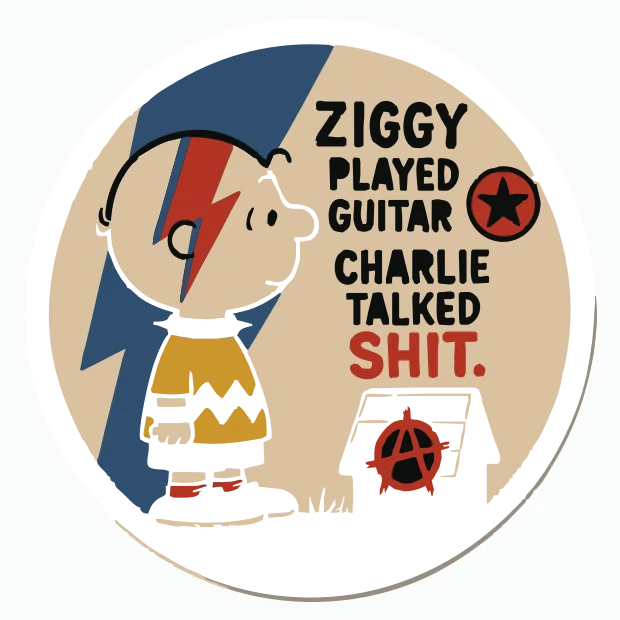
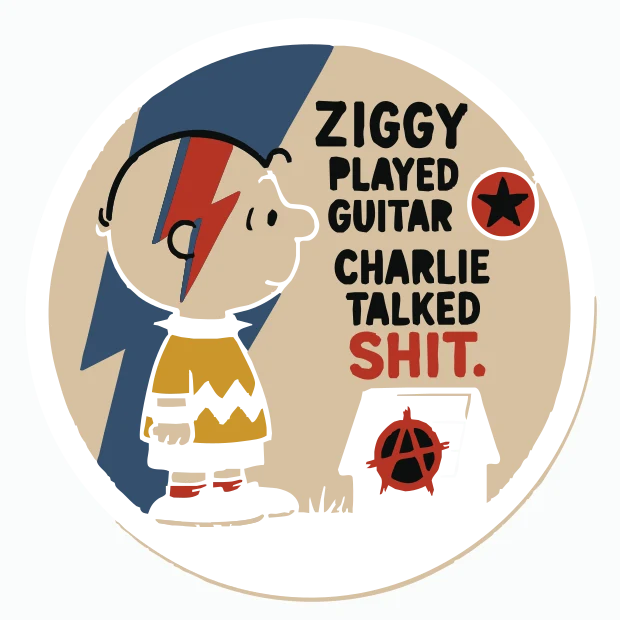
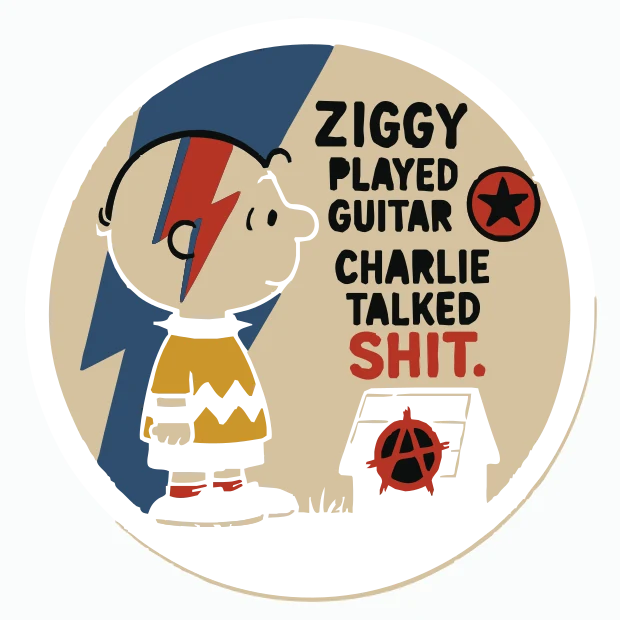
The lettering survives. What vanishes is the structure: the border ring that makes it a patch, the solid doghouse, the dark shorts. And raising the Colors control does not bring them back — the three results are near-identical, because every palette comes back with exactly one dark entry, and it is spent on the linework:
| Asked for | Fills returned | Dark fills |
|---|---|---|
| 4 colours | 7 | 1 |
| 6 colours | 6 | 1 |
| 8 colours | 6 | 1 |
Two things to take from that. First, the colour count you ask for is not the colour count you get — asking for 4 returned 7. Second, more colours is the natural thing to try and it is the wrong lever here; the quantiser has already decided the black is ink, so extra palette entries get spent subdividing the light areas.
What to do instead. Use a style that separates ink from colour explicitly rather than quantising everything into one palette. On this same artwork, Colour Plates + Outline identifies #090909 as the ink plate, keeps 100 ink strokes and produces 10 colour plates — the black survives because it was never a palette entry competing with the beige.
And for a border ring specifically: draw it. A circle with a satin border is two clicks, it sews better than a traced ring, and it is the kind of thing worth doing by hand rather than asking a tracer to find.
The general lesson. Check what is missing from a trace, not just what is present. Missing black fills are easy to overlook because the result still looks like a picture — it just quietly stopped being your picture.
A checklist before Accept
- Does it cover the whole picture? Compare the preview to your artwork, especially the bottom.
- Is the size right? Set the finished size before judging anything else.
- How much red? In Sew Preview, jumps and trims are drawn. A lot of long travel means a lot of trimming.
- What's missing? Compare against your artwork — especially large black areas, which can quietly quantise away (see above).
- Does the style report dropped marks? The beta styles tell you how many were too small to sew. That is artwork that will not be there.
- How many colours? Each one is a thread change you perform — and check what you actually got, not what you asked for.
- Run the pre-export check. It flags stitches that are too long or too short, anything outside the hoop, and unclassified regions.
Where these came from
The plates on this page are generated by scripts/render-stitch-anatomy.mjs, which runs the real engine on the sample image and draws the stitch stream it returns — sewn thread dark, jump travel red, short stitches dotted. The numbers in the captions are measured from the same stitch array that produced each picture, so the pictures and the figures cannot drift apart.
node scripts/render-stitch-anatomy.mjs
See also Every style, same picture for all sixteen styles run on this same bottle cap, and Exporting for the pre-export checks.