Drawing & stitch types
This page covers the fill types, outline types, the satin column tool, entry/exit points, stitch order, and color stops — everything that turns a shape into needle positions.
Every shape on the canvas carries a stitch type — the recipe bisect uses to turn its outline into real needle positions when you export. A shape can have a fill (stitches that cover its interior), an outline (stitches that trace its edge), or both. The satin column tool is a special case: instead of filling a shape, you draw the column directly as a pair of rails.
This page is the reference for all of those. For navigating, selecting, and ordering shapes, see The editor. For what happens at export, see Exporting.
The mental model: a fill answers "how do I cover the inside of this shape?", an outline answers "how do I trace its edge?", and a satin column answers "how do I lay a smooth band of thread along this path?" Pick the one that matches what you're making.
The shape tools (rectangle, ellipse, pen, freehand, text) all drop geometry onto the canvas pre-loaded with the active fill and color — see The editor → Tools for how each one draws. This page covers the stitch types you then apply to them.
Fill types
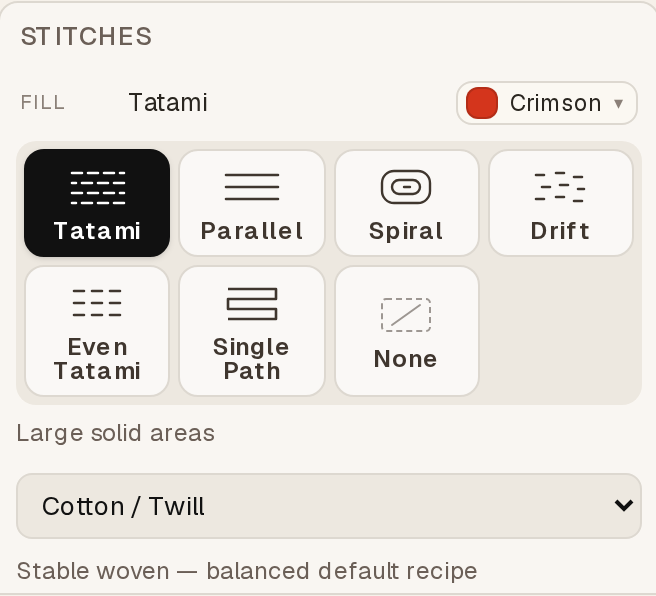
Select a shape and open the Fill section of the Properties panel. The buttons across the top choose how the interior is stitched. Choose None to leave the interior empty (outline-only).
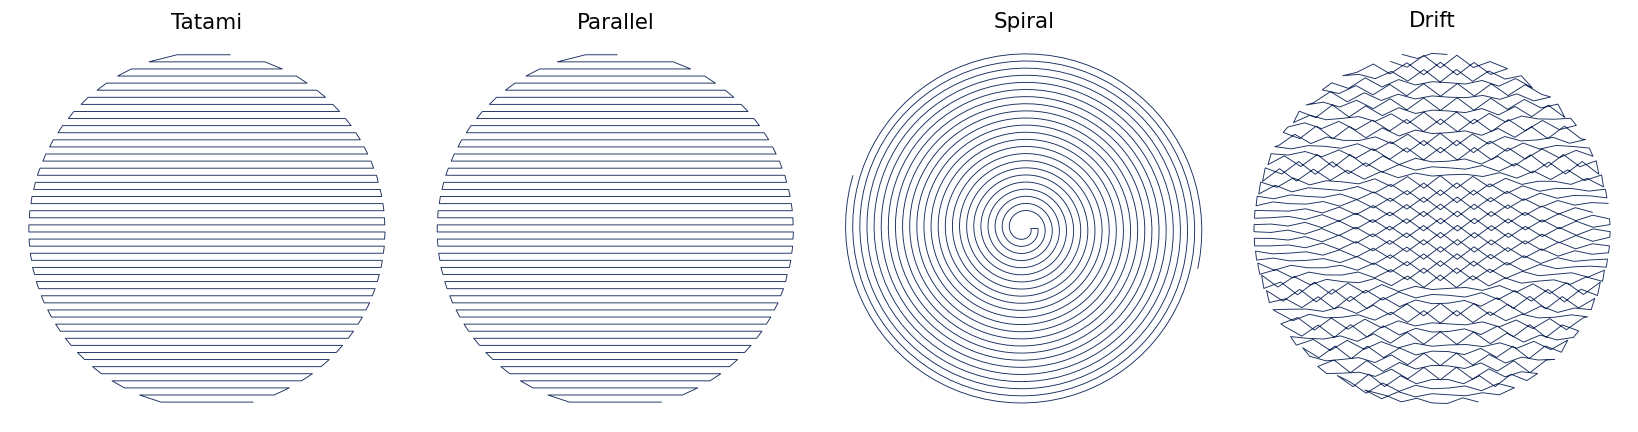
And here is what each one actually sews, on the same circle:
| Fill | What it does | Best for | Texture / notes |
|---|---|---|---|
| Tatami | Classic back-and-forth rows with a brick-style stagger so the needle holes don't line up. The default, and the most thoroughly tested. | Large areas, logos, big letters, backgrounds | Smooth, even coverage. Tune the Stagger (below) to scatter the holes. |
| Even Tatami | An experimental "march-the-grid" tatami variant. Same look family as Tatami, different row-generation path. | Trying an alternate tatami when standard tatami tracks oddly on a tricky shape | Also respects the Stagger slider. Newer; reach for standard Tatami first. |
| Parallel | Straight rows with no brick stagger — every row starts on the same line. | Short, narrow, or geometric shapes where a crisp aligned grain is wanted | Cleaner grain than tatami, but tracking lines can show on big areas. |
| Spiral | Rows follow the shape's contour, offsetting inward like a spiral / concentric rings rather than running straight. | Round and organic shapes — circles, leaves, blobs | Coverage hugs the edge; no single fixed angle. |
| Drift | Our organic wandering fill: stitch rows meander instead of marching in dead-straight lines, breaking up the mechanical grain for a hand-stitched, painterly feel. | Texture, fur, foliage, hand-made looks, anywhere a rigid fill feels too "machine" | Deliberately irregular. Not for crisp geometric coverage — that's what Parallel/Tatami are for. |
| Single Path | A connected (Eulerian) single-path fill that covers the area while minimizing jumps and travel. | Designs where you want one continuous run with as few thread breaks as possible | Trades some texture uniformity for path continuity. |
Tip: start with Tatami for anything sizeable. Switch to Parallel only when a small shape looks better with a perfectly aligned grain, and reach for Drift when you specifically want an organic, broken-up texture.
Stagger
The Stagger slider appears for the tatami family (Tatami and Even Tatami). It sets the brick-offset period — how many rows sew before the start-point pattern repeats. Offsetting the row starts scatters the needle holes so they don't pile into one line, which is what hides the diagonal tracking lines that otherwise show up across a solid fill.
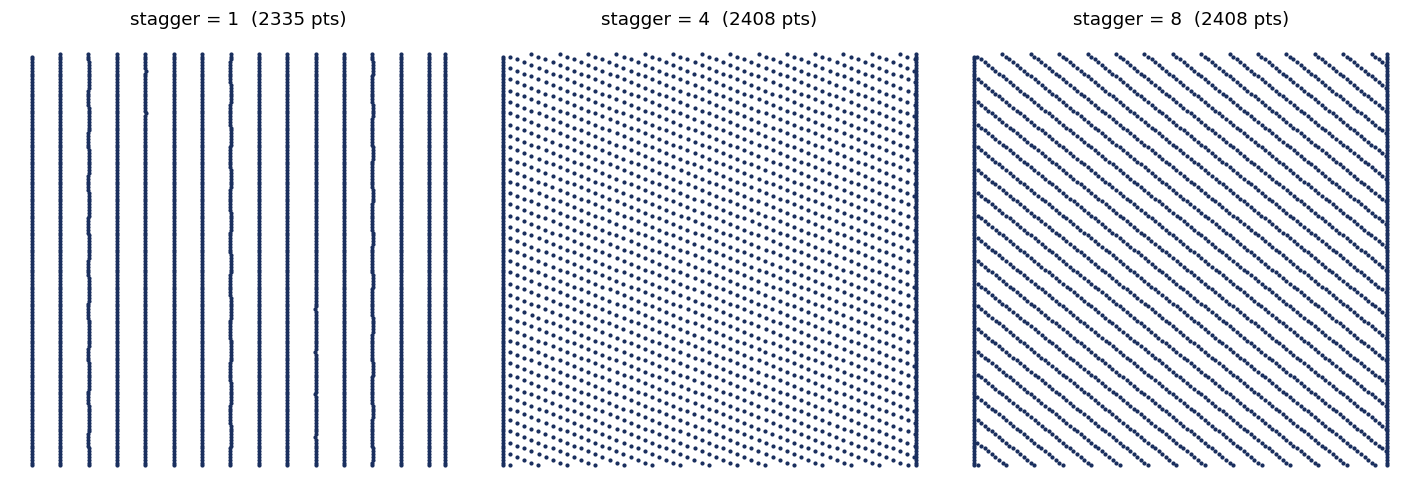
- Range 1–8, default 4 (matches the engine default and is the standard choice).
- 1 lines the holes up row-to-row (a visible grid — usually what you don't want on a solid fill).
- 2 gives a tighter texture.
- 4 is the safe all-rounder.
- Higher values scatter the holes more, doing the best job of dissolving tracking lines on large solid areas.
Stagger only affects tatami-style fills. Parallel, Spiral, Drift, and Single Path ignore it.
Fill settings
Once a fill is active, the rest of the Fill section controls how it sews.
Fabric preset. The dropdown at the top of the fill settings tunes density, pull/push compensation, underlay, and stitch-length limits for a specific material in one move. Pick the closest match before fine-tuning.
| Preset | Tip |
|---|---|
| Cotton / Twill | Default settings work well. |
| Pique Polo | Use firm underlay, increase density slightly. |
| Sweatshirt | Heavy underlay, increase pull comp to 0.3 mm. |
| Polar Fleece | Knockdown underlay, increase density. |
| Terry Cloth | Short-pile knockdown, heavy underlay. |
| Denim | Lower density OK, reduce pull comp. |
| Leather / Vinyl | Minimal underlay, fewer needle holes. |
| Nylon / Ripstop | Edge-stabilize, avoid puckering. |
Tip: the preset is a starting point, not a lock. After you pick one, every slider below stays fully adjustable.
Density. How tightly packed the stitches are, on a 1–10 scale. Lower = denser (more thread, more coverage). Most designs sit at 3–5.
Fill angle (local). The direction the stitch rows run, relative to the shape — not the hoop. Because it's local, rotating the element rotates the fill with it. Set it numerically with the slider (0–179°), or click the Fill angle button (the small triangle) in the selection toolbar above the shape — shortcut A — to drag a direction handle right on the canvas.
Edge Finish. How the fill's edge is treated: Off, Normal (adds a clean outline — the default), or Heavy (bolder edge).
Pull Comp (0–2 mm). Widens the shape outward to compensate for thread pulling the fabric inward as it sews, so the finished shape ends up the size you drew.
Push Comp (0–1.5 mm). Shortens satin-column ends to counter the length stretch caused by stitches pushing fabric outward. Left at 0, the engine computes a sensible value; set it to override.
Underlay (fill)
Underlay is hidden stitching laid under the visible fill to stabilize the fabric and lift the top layer so it sits crisp. Leave it on unless you have a reason not to. With underlay enabled you can pick the type:
| Underlay type | In short |
|---|---|
| Perpendicular | Rows running across the fill direction — general-purpose stabilization. |
| Center Run | A single run down the middle — light, good for narrow shapes. |
| Edge Run | A run that follows just inside the edge — holds borders. |
| Zigzag | A loose zigzag for moderate support. |
| Double Zigzag | Two crossing zigzags for stretchy/knit fabrics. |
| Fill Underlay | A light fill-pass underlay — the default, solid all-round stabilization. |
| Grid | A crosshatch grid for the most support on high-pile or unstable material. |
Outline types
The Outline section controls stitching along a shape's edge. A shape can carry an outline with or without a fill. Choose None for no outline.
| Outline | What it does | Key settings |
|---|---|---|
| Border | A satin-style band traced around the edge, with mitered corners. The heavyweight outline. | Width (1–12 mm); Corners mode (below). |
| Running | A single light line of stitches following the path. | Stitch Length (0.5–8 mm). |
| Bean | A reinforced running stitch — each segment sewn forward-back-forward for a thicker line without jumping to satin. | Stitch Length. |
| Triple | The whole path traversed three times for a bold, durable outline. | Stitch Length. |
| Satin | A satin band offset around the edge (the satin-band stroke). | Width (1–12 mm). |
| Track | Three parallel running lines offset from the centerline — a railroad-track look. | Stitch Length; Spacing (0.2–4 mm) between the parallel lines. |
| Chain | A decorative chain-stitch outline made of linked loops. | Loop Size (1–8 mm), Width (0.5–4 mm), Overlap (0–70%). |
You can give the outline its own color, independent of the fill, in the color row at the top of the section (reset it to fall back to the fill color).
Border corner modes
For the Border outline, the Corners dropdown sets how the band turns a corner:
- Short Stitch — packs short stitches into the corner to keep density even (the default; cleanest on letters).
- Round — rounds the corner off.
- Miter — extends the edges to a sharp point.
- Bevel — cuts the corner flat.
- Cap — caps the end square.
Satin column tool
The satin column is bisect's tool for laying a smooth, high-sheen band of thread along a path — the look you want for lettering, monogram strokes, scrolls, and decorative bands. It is not a fill applied to a shape. You draw the column itself as a series of rungs: each rung is a cross-bar spanning the column from one rail to the other. bisect threads two smooth rails through the rung endpoints and zig-zags stitches between them, perpendicular to the column's spine. Because you place the rungs, you control the width and the stitch direction at every point along the column — which is exactly how professional tools work.
Pick the tool from the toolbar (Satin Column, shortcut S). The cursor becomes a crosshair.
Drawing a column
You build the column rung by rung. Each rung takes two clicks — one for each rail:
- Click where the column's first edge starts (the first rail point).
- Click across the column for the matching point on the other rail. That completes the first rung.
- Keep clicking in pairs — left edge, right edge — walking the rungs down the path. As you go, bisect draws a live preview: the two rails, the cross-rungs, a dashed spine down the middle, and a faint area fill so you can see the band taking shape. A guide line suggests where the next rung wants to sit.
bisect automatically keeps successive rungs oriented consistently, so the column won't accidentally fold over on itself as you draw curves.
To finish, double-click in place (a stationary double-click — two clicks on the same spot), or press Enter. Press Escape to cancel and discard the draft. Switching to any other tool also finishes a usable draft for you.
Why the stationary double-click? A fast click-click drawing rhythm could otherwise be misread as a "finish" gesture and cut your column short. bisect only treats a double-click as finish when both clicks land on the same spot — quick drawing taps are left alone. A column needs at least 2 rungs to commit; anything shorter is discarded.
Editing a column
A committed column behaves like any other element: drag it to move, rotate, or scale it, and it keeps a live transform. To reshape the band itself, enter rung-edit mode:
- Double-click the column, or select it and press Enter, or click the Edit points button in the selection toolbar.
In rung-edit mode the column's handles come alive:
- Drag a red endpoint square to move that end of a rung — this is how you reshape a rail, widen or narrow the band, or change the stitch angle at that point.
- Click a white midpoint dot (between two rungs) to insert a new rung there — add detail where the band needs to follow a tighter curve.
- Right-click an endpoint to delete that rung. (A column always keeps a minimum of 2 rungs, so the last two can't be removed.)
When you're done, press Enter or Escape to leave rung-edit mode.
Insert Rung button
In the selection toolbar, the Insert Rung button adds a rung at the largest gap between consecutive rungs and drops you straight into rung-edit mode with the new rung's handles ready to adjust. It's the fast way to add resolution where a long straight stretch needs to start curving.
Satin column settings
Select a column to see its dedicated panel:
- Thread Color — set per column; the panel also shows the live rung count and an estimated stitch count.
- Stitch Density — the spacing between zig-zag stitches across the band, 0.2–1.0 mm (default 0.4 mm). Lower = denser, glossier, more thread. Density adapts automatically at tight corners so the inside of a curve doesn't bunch up.
- Pull Compensation (0–1 mm) — widens the column against fabric pull, automatically reduced at sharp corners so points stay crisp.
- Underlay — a pulldown with two choices: Center-walk (recommended) or None. Center-walk lays a single running line straight down the middle of the column, sewn first and then hidden under the zig-zag. It stops the satin from sinking into the fabric and stabilizes the band so it sits up crisp. Leave it on Center-walk unless you have a specific reason not to.
Wide spots in a satin column float long stitches that can snag. Keep individual rungs reasonable in width, or split a very wide band into shorter rungs — the rails and stitches honor your rungs exactly.
Entry & exit points
By default bisect's router decides where each element starts and ends stitching. When you want to control that — to chain elements neatly or avoid an awkward jump — open the Entry / Exit section and click Add entry/exit points.
- The green circle (IN) marks where stitching starts.
- The red square (OUT) marks where it ends.
Both are draggable on the canvas (click Edit on canvas in the section). bisect drops them on the element's current first and last stitch so you start from where it sews today, then nudge from there. With them set, the router keeps your orientation instead of choosing its own — which is what lets you control stitch order and minimize travel between objects. Click Remove to hand control back to the router.
Entry/exit points are per-element geometry, so they're available on single selections only.
Stitch order
The order shapes appear in the Layers / outliner panel is the order they sew. Drag to reorder; toggle the sequence overlay with Q to see it on canvas; and scrub one needle at a time with the stitch simulator. Full details — including the Optimize order write-back and order-pinning — are on The editor.
Color stops
Each thread color becomes a color stop in the exported file, and the machine pauses there for you to swap thread. Grouping same-colored objects minimizes those stops. The Order panel's Minimize colors button (or the Check panel's Auto-sort shortcut) reorders same-color elements to sit together in the sew sequence with no change to how the design looks. See Export for how stops land in each file format.
Outline-to-running on import
When you drop in an SVG, every stroke becomes a Running outline and every fill becomes a Tatami fill. Want something heavier? Select the shape after import and change its outline to Satin / Border or Triple, or swap its fill type, in the Properties panel.
Next step
When the stitch types are set, head to Exporting to write a machine file.
See also: The editor · Importing artwork · FAQs · Keyboard shortcuts